Lightning
Detector
This is a surprisingly simple project, yet fairly obvious after construction. I first saw this project described in a science book and thought “wow, that’s great!”, and just had to give it a go. Unfortunately the interest from my friends was practically non existent and my new ability to predict a lightning strike was wasted, but I still enjoy knowing when a strike is about to happen.
I hope that if your reading this you also feel that this is a project for your rainy and thundery evenings. It will allow you to tell that a lightening strike is about to occur within the next following seconds after a reading.
It works best when the lightning is right over you or very near, it is not sensitive enough to pre-detect a strike from a large range, but it will indicate a rise in values when the strike occurs.
Theory behind
the device
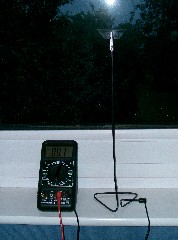
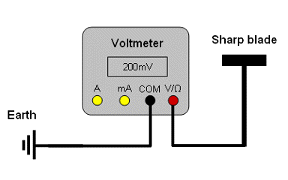
The device uses a short antenna with a sharp edge at the top for collecting the static charge build up between the earth and the atmosphere. A voltmeter is connected to this antenna and an earthing or ground point. The voltmeter is set to its most sensitive setting (usually milli-volts, mV).
As static charge builds up between the earth and the atmosphere before a lightning strike some of the static charge will flow from the ground through the volt meter and dissipate out into the atmosphere via the antenna. This will result in a rising value on the voltmeter from zero to an increasing value up until the lightning strike where it will drop back down to zero. The sharp edge of the razor blade creates an ideal object to dissipate charge as sharp points have/hold a higher electric potential density and therefore allows the charge to dissipate easier.
Some other devices found around the internet also use a slightly radioactive substance called Thorium (found in some lantern mantles) combined in epoxy and applied to the sharp blade to improve the dissipation of charge by ionising the air surrounding it.
Materials used
• Approximately 60cm of mains wire – single core, 1.7mm Ø
• One crocodile clip
• One new large Stanley knife blade
• A voltmeter with 200mV setting
• A good earthing point – e.g. mains electricity socket nearby (for earth pin)
Construction of the
device
Below is a simple diagram of what the device looks like. Notice the earth point is connected to the COM port on the voltmeter and the antenna is connected to the V/Ω port.
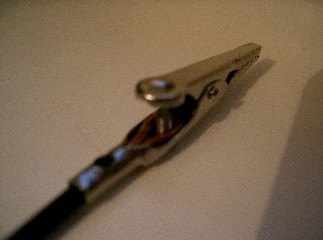
Firstly straighten the length of wire and strip the insulation back about 2cm at one end. Wrap the wire around the screw in the crocodile clip and clamp the wire in the crocodile clip neck with pliers. The photo right shows this a bit more clearly than my explanation.
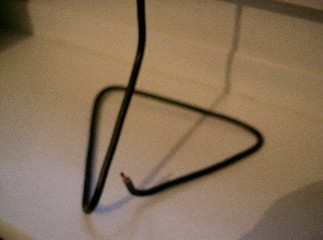
Similar to the photo shown left, the other end of the wire needs to be bent to form a base/stand using about 40cm the wire. A
centimeter of the insulation can then be cut ff this end as well.
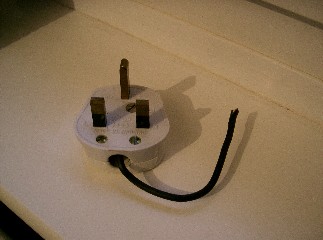
I am using the earthing rod in my house for the eathing point of this device, and for safety reasons I will use a standard UK plug to connect the device to earth. I have simply taken a short length of wire and connected it to the earth pin in the plug making sure it does not short with the live or neutral pins. Using a plug will make sure that a good connection to earth is preset. Alternatively if you don’t have access to an earthing point you can hammer a large metal bar in to the ground and use that.
The voltmeter just needs to be connected up with the device correctly and the sharp blade placed in the crocodile clip with the blade pointing up and horizontal. Now you just need to wait for a thunder storm.
WARNING: This device can act as a lightning conductor and should not be taken out side to a high place during a thunder storm.
Using the device
• Take the device to a mains socket or other earthing point.
• Make sure the device is wired up correctly and set the voltmeter to 200mV DC.
• The value on the display will rise until a lightning strike occurs.