
This
project will show you how I built a ball mill for the production of black powder
and other pyrotechnic compounds. There are two parts of this project, the first
is building the ball mill, and the second is how to produce lead balls for the grinding
media.
Ball mills are machines which are used to reduce the granular size of powdered chemicals and to mix chemicals
together to form pyrotechnic compounds. The finer a pyrotechnical compound is, the more
efficiently it will combust due to a higher surface area.
Ball milling pyrotechnic compositions is a very hazardous procedure. You should never mill any
combustible or shock sensitive compounds (e.g. flash powder), also the grinding media within a ball mill must be non-sparking, the most common grinding media is lead balls and ceramic media - never use chrome steel or glass
grinding media. You should always mill outside away from houses and the public.
To minimize the damage in case of an accident whilst milling a pyrotechnic compound I have set up a box made of concrete slabs reinforced with sand bags surrounding them. This will help stop shrapnel and aid in reducing the sound of an explosion.
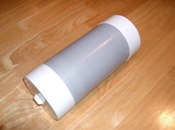
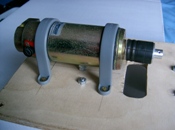
The first thing I did was to construct the tumbler barrel. This allowed me to deign the rest of the mill around the size of this barrel. I used a 250mm long length of 110mm Ø PVC pipe as the main part of the barrel. the end caps
I made myself with a vacuum forming machine at my school because of the expensive price of commercial end caps.

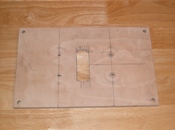
The next part was to build a platform on which the barrel could roll. For this I
used four castor wheels bolted upside down on a sheet of plywood. The gap
between the wheels must be about the right distance apart so that the barrel can
roll freely without the possibility of rolling off the casters. A large slot was
also cut out of the centre of the platform (see picture) which would allow a
motor belt to pass through it and around the barrel.
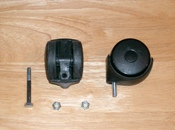
The next part was to mount the motor to the underside of the same board of
plywood. The motor shaft has to be placed in the centre of the plywood platform
to allow a rubber belt to pass through it. To mount the motor to the plywood
platform, I used PVC pipe brackets which fitted the motor almost perfectly. I
used some rubber inner tube wrapped around the motor where the brackets would be
clamped to add grip and to stop the motor spinning in the brackets when in use.
I screwed the brackets down using small brass wood screws and a couple of
washers. The mounting turned out to be surprisingly sturdy and ridged.

The motor shaft had to have a wheel/pulley attached to hold the rubber motor
belt. I used a short length of aluminium bar for this. I drilled a hold straight
through the centre of the bar with the same diameter of the motor shaft. The
pulley needed a grub screw to grip and hold the pulley in place on the motor
shaft. This was done by drilling a hole perpendicular to the shaft hole on the
pulley and then threading and counter sinking the hole. A short section of thin
inner tube was stretched over the pulley to add grip.
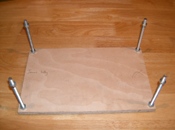
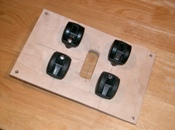
Now that the platform and motor mount have been finished, a base is needed. This
was simply another piece of plywood of the same dimensions of the platform used
before. Four holes in the corners of both plywood boards were drilled. Then four
threaded bars of appropriate length were bolted to the base board (as shown in
photo) the top platform could then be bolted to the threaded bars as well. The
mill is now structurally completed.
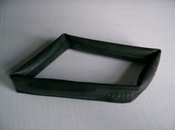
The next thing to do before the ball mil is completed is to make a motor belt.
I used a length of bike inner tube. The belt needs to be under a fair amount of
tension when in operation to take this into consideration when performing the
next step. Determine the length needed to pass around the barrel and motor
pulley by simply wrapping it round by hand and marking it, making sure there is
tension in the inner tube band. Now using rubber solution found in nearly all puncture
repair kits, adhere one end of the tube into the other following the
instructions for using the rubber solution carefully.
Production of lead ball
grinding media
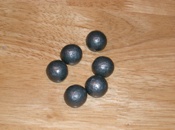
Due to the high costs of lead balls available from grinding media and
polishing shops and from fishing shops, I decided to make my own lead balls by
casting them. A ball mill should be filled approximately half full with grinding
media, and that is equivalent to about 80 lead balls in this case. The first
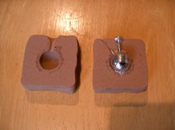
thing I did was to mould some wet clay into two thin rectangular blocks. I then
got a computer mouse ball (which was about the right size of media that I
wanted) and pressed it into the centre of the clay blocks,
deeper than
half way and removed them. The reason for making the depressions deeper than
half way is that to make clean flat surfaces I would be sanding that face flat
also making the depressions the correct hemispherical depth. I then used a thin
wooden rod to make depressions for an inlet channel and air an escape channel,
making sure each block was a mirror image of each other.
I then baked the clay in an oven at a low temperature of 80°C for about an hour to slowly
evaporate
the water out of the clay. If heated too quickly the clay cracks due to the
expansion of gases and water vapour. After being dried in the oven the clay
moulds can be heated on full power - cooking ovens at about 220°C do not get
hot enough to actually produce cured pottery from the clay but they will set it
hard enough for use as a casting mould. They need to be in the oven for about
another one to two hours on full power.
After the moulds have cooled down, the faces of each block have to be sanded
flat. I glued a sheet of sandpaper to a flat sheet of MDF to provide a flat
sanding surface. I sanded each face down until the hemispherical depressions
were as close to exactly hemispherical as I could. The faces then need to be
placed together so that the two hemisphere make a complete sphere and the out
side of the mould marked in several positions to realign the mould halves in the
future. I did this by trial and error - I placed the mould haves together and
cast a lead ball, I then opened the mould and moved the mould halves accordingly
for the next casting before recalibrating my marks on each mould halve. I did
this process until the mould halves were exactly aligned.
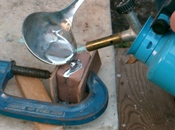
To cast a lead ball, set up your mould halves and gently clamp them together
using a G-clamp. Then place a few scraps of lead in a cooking ladle and using a butane torch melt the lead in the ladle
until it is completely molten (this is clear when the molten lead rolls around
freely with high surface tension and does not 'stick' to the ladle when moved
around gently). The molten lead can then be slowly poured into the mould through
the inlet channel until the mould is filled (the inlet channel is the bigger of
the two channels, also note that the air outlet channel should be as vertical as
possible but still allowing molten lead to be easily poured into the inlet
channel).
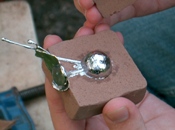
After waiting a couple of minuets for the lead to solidify open the
mould halves gently and remove the lead ball. The lead will stay hot for a long
while after casting, but once it has cooled enough to handle you can use a file
to clean up the excess bits of lead around the ball.
This is just a small guideline to operating the device.
• Simply fill the ball mill with the compounds you want to mix/mill, but don't
over fill the ball mill.
• Connect the motor up to a power supply.
• Mill the compounds for about 3 hours - time may vary depending on what grain
size you desire and the properties of the compounds being milled.